Tuesday, April 30, 2013

Install Printer Via IP Address ( Network Printer )

Windows 7: Install Printer Via IP Address

Install a printer in Windows 7 using an IP address. 
1. Click Start and type print in the search box. Click Devices and Printers.


2. Select Add a printer.
3. Select Add a Network, Wireless, or a Bluetooth Printer.


4. The printer may appear in the box. If so, select it. If not click The Printer That I Want Isn’t Listed.

5. Select Add a printer using a TCP/IP address or hostname. Click Next.


. Select TCP/IP Device in the Device type list.
7. Type the hostname or the IP address of the printer. Click Next.


8. Windows 7 should find the printer if the printer is on and configured correctly. You may have to specify more information. If prompted, Select the type of network adapter installed in the printer in the Device Type drop-down list. You can also click Custom to specify custom settings for the network printer. Click Next.

Finish

Wednesday, April 24, 2013

Cisco vpn client minimized to taskbar

The problem can be found in the file vpnclient.ini,
"C:\Program Files\Cisco Systems\VPN Client".

There are probably som really high values in the
logwindX =0
and
logwindowy=0 values
Just delete these lines and start the client again.

Block a website in local PC

How to block a website in local PC

The location of the hosts file depends on your operation system.
Windows XP, Vista and Windows 7 C:\WINDOWS\system32\drivers\etc\hosts
Windows 2000  C:\WINNT\system32\drivers\etc\hosts

Note! Make a backup of the hosts file and put it somewhere safe, in case you mess up.
1. Open the hosts file using Notepad or other plain text editor.
2. Find the line 127.0.0.1 localhost
3. To block, for example, the website youtube.com, add this text under 127.0.0.1 localhost:
   127.0.0.1 youtube.com

4. Save and close the Hosts file.
5. Reboot your computer to apply the changes.
6. Try to open www.youtube.com into a browser.


Monday, April 22, 2013

share an internet connection on LAN


Now you have to follow this steps:
1: you must have one system with 2 LAN card

2: plug the internet provider jack to one of them

3: plug another Lan cod(cross) to another port of the system to the switch / hubs in point(may be any one of the corner points of the device)

4:now check all the device are working or not
......................................…
if no then then fix it and if yes then:

steps:
1: go to my network places , select view network connections from the side bar.........

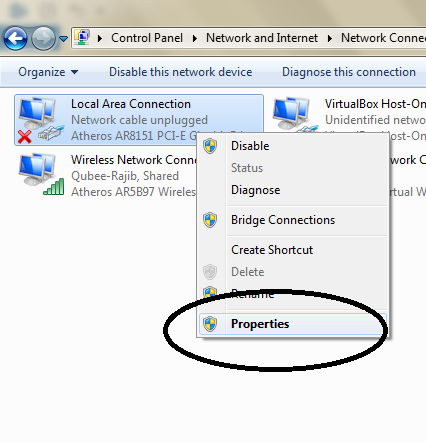
2: select the network connection which is connected to the LAN or hub and go to its property by rightclicking it

3: go to tcp/ip properties fron it and select advance tab

4: their you find Internet Connection Sharing check boxes , select Allow other network users to connect through this computer's Internet connection

5.You can enable or disable the allowing of other users to control the connection—users don't need to be able to control the connection to use it.

6.Under Internet Connection Firewall, select the Protect my computer and network by limiting or preventing access to this computer from the Internet check box for this network card, unless you have another firewall between the computer and the Internet. This is very important.

7.Click OK, and Internet Connection Sharing will be enabled.

Note: You must have administrative rights to enable ICS. After enabling ICS, verify that Internet connectivity is still functional on the host computer before testing the client computers. Remember to leave the host computer on all the time or turn it on before the other networked computers, so the client computers can request an IP address from the host.


\


How to Share a Printer Over a Local LAN.

How to Share a Printer Over  a Local LAN.

Click the Start menu, choose Network, and click the Network and Sharing Center button along the top.


 Go Control Panle

 Network & sharing

 change advanced sharing


then do this and save. now install printer which i want to share. when printer install is done. 


then go to start click device and printer , now right chick your desire printer, select printer properties 


 select share tab, mark share and give a name. then click ok.


Printer sharing is done.
Connect to the printer with all the other computers in the network that you need to use the printer.

fast go to another PC's start Button,
then run.

 type your printer connected pc's IP address
Such as.
\\192.168.3.13


Then Double click the printer icon and its installed.


Note:
You must insure that all pc are connected in same network. such as (192.168.3....) 


and Enjoy .
thanks rajib

Sunday, April 21, 2013

How to add an old pst or archive pst file to Outlook

How to add an old .pst or archive .pst file to Outlook 2010

Outlook emails may be saved in .pst files. For example, you may have a file called archive.pst or something similar, that you want to get into Outlook 2010.

Click on File, Info, Account Settings then Account Settings, as in the image below.

Image of Outlook 2010 open data files

Click on the Data Files tab, then on Add. Make sure that Outlook data file(.pst) is highlighted and click on OK.
Image of Excel 2010 Options > Save

Browse to your .pst file, Which you already create or backup. and click on OK.

Image of Excel 2010 Options > Save

You should now find your mail in Outlook, listed below your email folders, as shown below.


Image of Excel 2010 Options > Save

Friday, April 19, 2013

Speed Up Windows 7

Ultimate Collection of Registry Tweaks to Speed Up Windows 7

Right-click on Computer icon on Desktop and select Properties (or press WIN + Pause/Break keys). Now click on Advanced system settings link in left side pane (You can open it directly by giving sysdm.cpl command in RUN or start menu search box). Now click on Settings button in Performance section:
It'll open another window. Disable all unnecessary options in Visual Effects tab, you can leave following options enabled according to your requirements:
  • Enable Aero Peek (If you want to use Aero Peek feature)
  • Enable desktop composition (If you want to use Windows Aero theme)
  • Enable transparent glass (If you want to use transparency in Windows)
  • Show thumbnails instead of icons (If you want to show thumbnails in Explorer)
  • Show window contents while dragging (If you want windows to show contents while moving them)
  • Smooth edges of screen fonts (If you want to show smooth fonts)
  • Use drop shadows for icon labels on the desktop (If you want to show shadows under desktop icon labels)
  • Use visual styles on windows and buttons (If you want to use Windows Aero or Basic theme)
3. Open Windows Explorer and go to "Organize -> Folder and Search Options" and click on "View" tab.
Now disable following options:
  • Display file size information in folder tips
  • Hide extensions for known file types
  • Show encrypted or compressed NTFS files in color
  • Show pop-up description for folder and desktop items
Windows_Folder_Options.png
4. Right-click on Computer icon on Desktop and select Manage (You can also open it directly by giving services.msc command in RUN or start menu search box).
Now go to Services & Applications -> Services. Here you can set a few unnecessary services to Manual, so that these services don't start automatically with Windows and you can get a faster startup.
Visit following tutorial to know which services can be set to MANUAL to increase system performance:
5. Type msconfig in RUN or Start Menu search box and press Enter. Now go to Startup tab and disable unwanted startup entries. You can disable your graphics card's driver utility, Sound Card utility, etc to speed up the system startup and to increase system performance.
6. Open Sound applet in Control Panel (or type mmsys.cpl in RUN or Start Menu search box and press Enter). Now go to Sounds tab and select No Sounds from Sound Scheme section. You can keep some of your favorite sounds enabled but make sure to set Exit Windows, Windows Log off, Windows Logon and Start Navigation to (None).
Also disable "Play Windows Startup sound" option to disable the sound clip which is played at login screen.
7. Also don't forget to:
  • Install only necessary software
  • Use the latest device drivers
  • Keep your Windows up-to-date
After following all the above mentioned points, you'll definitely notice major improvements in your Windows 7 performance.

Microsoft Exchange account For Outlook

Add a Microsoft Exchange account

Exchange accounts can be added when you run Outlook for the first time, or by closing Outlook, and then clicking the Mail icon in Control Panel in Windows.
 Note   There can be only one Exchange account in a profile.

  1. Close Outlook.
  2. In Control Panel,


open the Mail module.


 Create a new profile  
    1. Under Profiles, click Show Profiles.
    2. Click Add.
    3. In the New Profile dialog box, type a name for the profile, and then click OK.
This is the name that you will see when starting Outlook if you configure Outlook to prompt you for a profile to use.
Choose an existing profile  


The title bar of the Mail Setup dialog box contains the name of the current profile. To select a different profile, click Show Profiles, select the profile name, and then click Properties.
  1. Click E-mail Accounts.
  2. Click New.
Your Windows domain credentials are used to configure your Exchange account automatically.
  1. Click Next.


After the configuration of your Exchange settings is complete, click Finish.

How to archive in outlook 2007


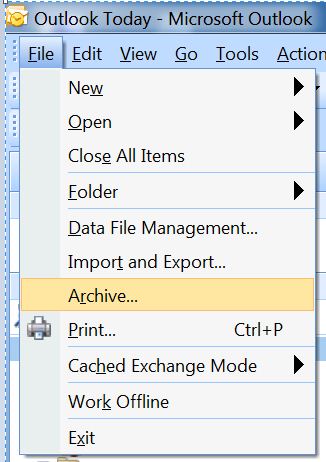
  1. On the File menu, click Archive.


2. Select the Archive this folder and all subfolders option, and then specify a date under Archive items older than

3. Under Archive file, click Browse to specify a new file or location if you do not want to use the default file or location.


Click OK.


Repair pst or ost file in outlook

  1. Open Windows Explorer and select the drive 
  2. C:\Program Files\Microsoft Office\OFFICE14 folder.
  3. Double-click Scanpst.exe.

  1. In the Enter the name of the file you want to scan box, enter the name of the .pst or .ost file that you want to check, or click Browse to select the file.
  2. To specify the scan log options, click Options, and then click the option that you want.
  3. Click Start.
  4. If errors are found, you are prompted to start the repair process to fix the errors.
A backup file is created during the repair process. To change the default name or location of this backup file, in the Enter name of backup file box, enter a new name, or click Browse to select the file that you want to use.


  1. Click Repair.
  2. Start Outlook with the profile that contains the .pst file that you tried to repair.
  3. In the Navigation Pane, click Folder List.
Keyboard shortcut  To open switch to the Folder List, press CTRL+6.
In the Folder List, you might see a folder named Recovered Personal Folders that contains your default Outlook folders or a Lost and Found folder. The recovered folders are usually empty, because this is a rebuilt .pst file. The Lost and Found folder contains the folders and items recovered by the Inbox Repair tool.
You can create an Outlook Data File (.pst), and drag the items in the Lost and Found folder into the new data file. When you have finished moving all the items, you can remove the Recovered Personal Folders (.pst) file, including the Lost and Found folder, from your profile.

Configure Cisco Site-to-Site IPsec VPN


Configure Cisco Site-to-Site IPsec VPN


Router 3

crypto isakmp policy 10
 encr 3des
hash sha
 authentication pre-share
 group 2
!
crypto isakmp key test address 30.30.30.2
crypto isakmp enable
!
!
crypto ipsec transform-set myvpn esp-3des esp-sha-hmac
!
crypto map myvpn 10 ipsec-isakmp
 description 10
 set peer 30.30.30.2
 set transform-set myvpn
 match address A_to_B
!
interface FastEthernet0/0
 ip address 10.10.10.1 255.255.255.252
 duplex auto
 speed auto
 crypto map myvpn
!
interface FastEthernet0/1
 ip address 192.168.1.1 255.255.255.0
 duplex auto
 speed auto
!
interface Vlan1
 no ip address
 shutdown
!
ip classless
ip route 20.20.20.0 255.255.255.252 FastEthernet0/0
ip route 30.30.30.0 255.255.255.252 FastEthernet0/0
ip route 0.0.0.0 0.0.0.0 FastEthernet0/0
!
ip access-list extended A_to_B
 permit ip 192.168.1.0 0.0.0.255 172.16.1.0 0.0.0.255


Router 2

crypto isakmp policy 10
 encr 3des
 hash sha
 authentication pre-share
 group 2
!
crypto isakmp key test address 10.10.10.1
crypto isakmp enable 
!
!
crypto ipsec transform-set myvpn  esp-3des esp-sha-hmac
!
crypto map myvpn 10 ipsec-isakmp
 description 10
 set peer 10.10.10.1
 set transform-set myvpn
 match address B_to_A
!

interface FastEthernet0/0
 ip address 30.30.30.2 255.255.255.252
 duplex auto
 speed auto
 crypto map A_to_B
!
interface FastEthernet0/1
 ip address 172.16.1.1 255.255.255.0
 duplex auto
 speed auto
!
interface Vlan1
 no ip address
 shutdown
!
ip classless
ip route 20.20.20.0 255.255.255.252 FastEthernet0/0
ip route 10.10.10.0 255.255.255.252 FastEthernet0/0
ip route 0.0.0.0 0.0.0.0 FastEthernet0/0

ip access-list extended B_to_A
 permit ip 172.16.1.0 0.0.0.255 192.168.1.0 0.0.0.255


router 0

interface FastEthernet0/0
 ip address 10.10.10.2 255.255.255.252
 duplex auto
 speed auto
!
interface FastEthernet0/1
 ip address 20.20.20.1 255.255.255.252
 duplex auto
 speed auto
!
interface Vlan1
 no ip address
 shutdown
!
ip classless
ip route 30.30.30.0 255.255.255.252 FastEthernet0/1


router 1

interface FastEthernet0/0
 ip address 20.20.20.2 255.255.255.252
 duplex auto
 speed auto
!
interface FastEthernet0/1
 ip address 30.30.30.1 255.255.255.252
 duplex auto
 speed auto
!
interface Vlan1
 no ip address
 shutdown
!
ip classless
ip route 10.10.10.0 255.255.255.252 FastEthernet0/0


Tuesday, April 16, 2013

Load Balancing - MikroTik


/ip address> add address=192.168.4.1/24 interface=ether1-gateway disabled=no

/ip address> add address=192.168.5.1/24 interface=ether2-gateway disabled=no

/ip address> add address=192.168.0.1/24 interface=ether4-local-slave  disabled=no

/ip firewall nat> add chain=srcnat action=masquerade to-addresses=0.0.0.0 out-interface=ether1-gateway
/ip firewall nat> add chain=srcnat action=masquerade to-addresses=0.0.0.0 out-interface=ether2-gateway

/ip firewall mangle> add chain=input action=mark-connection new-connection-mark=gateway1 passthrough=yes in-interface=ether1-gateway
/ip firewall mangle> add chain=input action=mark-connection new-connection-mark=gateway2 passthrough=yes in-interface=ether2-gateway

/ip firewall mangle> add chain=output connection-mark=gateway1 action=mark-routing new-routing-mark=to_gateway1
/ip firewall mangle> add chain=output connection-mark=gateway2 action=mark-routing new-routing-mark=to_gateway2

/ip firewall mangle> add chain=prerouting dst-address=192.168.4.0/24 action=accept in-interface=ether4-local-slave
/ip firewall mangle> add chain=prerouting dst-address=192.168.5.0/24 action=accept in-interface=ether4-local-slave

/ip firewall mangle> add chain=prerouting dst-address-type=local in-interface=ether4-local-slave per-connection-cl
assifier=both-addresses-and-ports:2/0 action=mark-connection new-connection-mark=gateway1 passthrough=yes
/ip firewall mangle> add chain=prerouting dst-address-type=local in-interface=ether4-local-slave per-connection-cl
assifier=both-addresses-and-ports:2/1 action=mark-connection new-connection-mark=gateway2 passthrough=yes

/ip firewall mangle> add chain=prerouting connection-mark=gateway1 in-interface=ether4-local-slave action=mark-rou
ting new-routing-mark=to_gateway1
/ip firewall mangle> add chain=prerouting connection-mark=gateway2 in-interface=ether4-local-slave action=mark-rou
ting new-routing-mark=to_gateway2

/ip route> add dst-address=0.0.0.0/0 gateway=192.168.4.1 routing-mark=to_gateway1 check-gateway=ping
/ip route> add dst-address=0.0.0.0/0 gateway=192.168.5.1 routing-mark=to_gateway2 check-gateway=ping

/ip route> add dst-address=0.0.0.0/0 gateway=192.168.4.1 distance=1 check-gateway=ping
/ip route> add dst-address=0.0.0.0/0 gateway=192.168.5.1 distance=2 check-gateway=ping


Cisco IPSec VPN Client & Windows 8


Introducing The Problem

The Cisco VPN client is one of the most popular Cisco tools used by administrators, engineers and end-users to connect to their remote networks and access resources.

With the introduction of Windows 8, Cisco VPN users are faced with a problem – the Cisco VPN software installs correctly but fails to connect to any remote VPN network.

When trying to connect to a VPN network through a Windows 8 operating system (32 or 64 bit), the Cisco VPN client will fail to connect. As soon as the user double-clicks on the selected Connection Entry, the VPN client will begin its negotiation and request the username and password.

As soon as the credentials are provided, the VPN client shows the well-known “Securing communications channel” at the bottom of the windows application.

After a couple of seconds the Cisco VPN client will timeout, fail and eventually the connection is terminated. The user is then greeted by a pop up window explaining that the VPN failed with a Reason 442: Failed to enable Virtual Adaptor error:


Note: It’s always a great idea to have the latest Cisco VPN client installed.


Introducing the Fix – Workaround


Thankfully the fix to this problem is simple and can be performed even by users with somewhat limited experience.


Here are 4 easy-to-follow steps to the solution:


1. Open your Windows Registry Editor by typing regedit in the Run prompt.


2. Browse to the Registry Key HKEY_LOCAL_MACHINE\SYSTEM\CurrentControlSet\Services\CVirtA


3. From the window on the right, select and right-click on DisplayName and choose Modify from the menu. Alternatively, double-click onDisplayName:


4. For Windows 8 32bit (x86) operating systems, change the value data from @oem8.inf,%CVirtA_Desc%;Cisco Systems VPN Adapter to Cisco Systems VPN Adapter.(Remove @oem8.inf,%CVirtA_Desc%; )


For Windows 8 64bit (x64) operating systems, change the value data from @oem8.inf,%CVirtA_Desc%;Cisco Systems VPN Adapter for 64-bit Windows to Cisco Systems VPN Adapter for 64-bit Windows (shown below):


 or install this software
vpn-client-2.2.0-rc-4.exe